If you’re creating content, then you need to be using an editorial content calendar. They’re an essential tool for planning what you’ll publish and keeping organized so you can work efficiently and hit your deadlines. Without a calendar, your blog (and other channels) are liable to go off the rails, and it will feel like you’re always struggling to keep up with enough content for your audience.
If you’re here, that means you probably have some questions, such as:
- How do you create a content calendar?
- What does a well-designed calendar look like?
- Are there templates you can use to set up your blog calendar quickly?
In this article, we’ll cover all those questions and more. By the time you’re done, you’ll know exactly how to finally get all your content in order, write and create content more quickly, and get it all done with less stress. Plus, you’ll find a free content calendar template you can use right now.
Table of Contents
- What Exactly is an Editorial or Content Calendar?
- Who Uses Content Calendars?
- Why Should Bloggers and Content Creators Use a Calendar?
- What Information Should Your Content Calendar Include?
- Questions to Ask Before Building Your Content Calendar
- How to Create an Editorial Calendar That Will Work for Your Content
- Setting Up Your Calendar With Our Free Editorial Calendar Template
- Seven Editorial Content Calendar Examples You Can Follow
- Three Additional Tips for Using Your Content Calendar
- Now You’re Ready to Rock Your Content Calendar
What Exactly is an Editorial or Content Calendar?
An editorial calendar is a visual schedule of the content you will publish on your blog (or other channels). They include the topics and deadlines for your articles, as well as other information, such as authors, content details, intended audiences, target keywords, and more.
Bloggers and marketers have borrowed the concept of an editorial calendar from the journalism world, where writers and editors have been using calendars to keep organized for decades. No matter what type of content creator you are, you can benefit from using such a calendar.
Who Uses Content Calendars?
All types of content creators! Here are some more specific examples:
- Bloggers
- Journalists
- Podcasters
- Newsletter writers
- Video creators
- Social media managers
This article is most focused on bloggers and publishers, but no matter what type of content creator you are, you can use an editorial calendar (and most of this advice should still apply).
Why Should Bloggers and Content Creators Use a Calendar?
Failure to plan is planning to fail. You’ve probably heard this phrase before and that’s because it’s accurate advice that has stood the test of time. If you have no clue what you’ll publish, or when you’ll publish it, you’ll always be scrambling to create content.
Failure to plan is planning to fail. Here’s why all content creators need to use a content calendar:
Tweet
They Help You Get Organized
How does it make you feel when you see mess and clutter around your house? It probably makes you stressed and anxious. If you can develop good habits to keep your space clean, you can avoid those negative feelings, and be happier and more productive.
Your calendar is the home for your blog’s content. The better you
organize your content, the better you’ll feel, and the more productive
you’ll be.
This is supported by scientific research. According to Monster.ca, keeping organized can help you increase productivity, reduce stress, get things done on time, and meet deadlines. Those are all benefits that most content creators would love to enjoy, right?
They Help You Think Strategically
Your content calendar is not your content strategy. However, it is a useful tool for executing your strategy. When you know who your audience is and why you are creating content, you can more easily plan topics to target that your audience wants to read, watch, and hear.
If you don’t plan what you publish ahead of time, you’re more likely to rush your work, and your results will probably suffer as a result. When you map out your ideas on a calendar, you can be more thoughtful about what you publish, and make sure everything aligns with your audience.
They Help You Collaborate With Your Team
If you have multiple people working on your blog (like editors, writers, and other contributors), the editorial calendar can be your single source of truth for what you are working on. It makes it easy for everyone to see what is getting done and when it will be published.
Without a calendar in place, you’re forced to rely on back-and-forth email threads and Slack messages, trying to figure out what’s going on. This is chaos and it results in frustration.
What Information Should Your Content Calendar Include?
You can organize any type of content you plan to publish on a calendar. But what details should it include for each piece? It depends on what you’re creating, but at a high level, here are some things to consider including:
- A working title for each piece.
- A short description of the content.
- Who is working on the content (if you have more than one person working on content).
- The date the content will be published.
- Which channel or publication the content will be published on.
You can add more details (which we’ll cover later in this article) but these are basic pieces of information the calendar should include.
Creating a content calendar? Here’s everything you should include:
Tweet
Questions to Ask Before Building Your Content Calendar
Before you dive into creating your calendar, take some time to prepare, and answer the following questions. This will help you set up your calendar for success.
Question 1: What Type of Content Are You Creating?
Editorial calendars may have their roots in the journalism world, but that doesn’t mean they’re limited to organizing the written word. You may want to use your calendar to plan other types of content, like email newsletters, videos, and social media posts.
Question 2: How Often Do You Plan to Publish Content?
There’s no such thing as a perfect publishing cadence, and what makes sense for someone else, may not make sense for you. But it’s smart to set a regular schedule and stick to it. This creates consistency and sets expectations for how often your audience can expect new content.
If you’re new to creating content, consider setting an easy goal, like publishing once every two weeks. Then, once you’re comfortable meeting this cadence, consider increasing your volume to one piece per week. Start small and then work your way up to a more ambitious pace.
Question 3: How Many People Will Be Using Your Calendar?
If you’re the only person using your calendar, then the calendar will only need to make sense to you. In this case, you can set up and organize it any way you’d like.
However, spreadsheets often only make sense to the person who created them. If you’ll have more team members collaborating with you, you may need to consider the needs of other people, and set up the calendar in a way that will be easy for everyone to follow.
This may mean:
- Using color coding that everyone agrees upon.
- Including fields and columns that can support each type of content your team publishes.
- Choosing clear and simple names for columns and tags that are easy to understand.
Ask yourself these questions before you build your editorial calendar:
Tweet
How to Create an Editorial Calendar That Will Work for Your Content
Now it’s time to dive into the nuts and bolts of creating your calendar. We’ll start by going through the steps at a high level. Then, we’ll dig deeper into the details.
Step 1: Choose Which Content Calendar Tool You’ll Use
There are lots of different apps and tools you can use to create a calendar. Some have different price points and different advantages over others. Let’s take a look at some common examples:
- Spreadsheets: Google Sheets is the most simple option you can start with. Tools like Airtable and ClickUp, which expand upon the capabilities of basic spreadsheets, are also great options (and they even have pre-built templates you can use to create a calendar).
- Project management tools: Popular project management apps like Trello (which we use at WordPress.com) and Asana can be effectively used as editorial calendars. They’re designed to manage all kinds of projects, and that includes blogging and content creation.
- Calendar apps and plugins: Purpose-built editorial calendar software and plugins like CoSchedule Marketing Calendar, Edit Flow, and Editorial Calendar can add advanced automation features and integrate directly with your WordPress website.
If you have never created a content calendar before, consider starting with a simple spreadsheet. This is the easiest and lowest-cost way to begin. If you already have access to some type of project management tool, then they can also be a great option.
Once you know what you want from your calendar, more advanced options are worth consideration. They can offer much more power than what’s possible with other options.
Step 2: Set Up Your Calendar
No matter what tool you use, there are some basic steps you’ll need to follow to set it up. These items include:
- Formatting: What information does the calendar need to show for each piece of content?
- Color-coding: What will colors and labels refer to? Some ideas include color-coding by channel, by content type, or by topical area or blog category.
- Information about your content: What details need to be included?
Having a clear mental picture for each of these items now will help you to set up the calendar later.
Step 3: Plan Your Content Themes
There are probably some high-level themes and events that you know you’ll want to plan content for over the course of the year. These could include:
- Holidays: Are there any holidays that are relevant to your blog or brand?
- Major events that are important to the subjects your blog or publication covers: This could include major annual events, conferences, or other happenings you know will be coming up.
- Sales and buying seasons: For example, a fashion blog might plan pieces for each season’s trends.
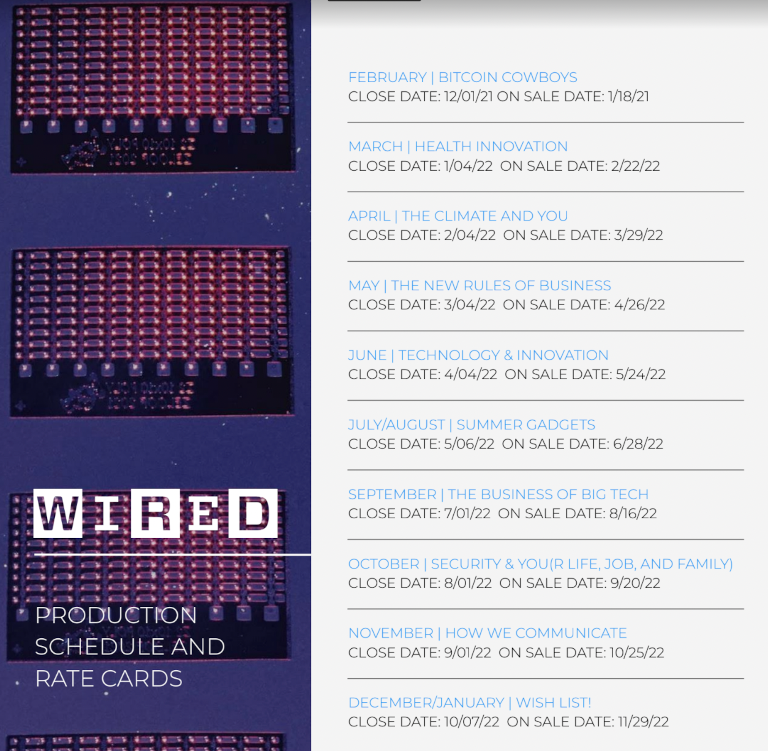
You might also think of themes as topical categories your content will cover. Another way you can think of this is to approach content themes like a magazine. They often publish their content themes on their websites or in their media kits to help advertisers choose appropriate issues to buy advertising in. Here’s one from Wired’s media kit:
There are several different ways you can plan content themes. You can learn more about planning content themes on this episode of the Tiny Marketing Show.
Step 4: Build a List of Topics and Ideas
The best way to keep your content pipeline full is to create a backlog of topics and ideas that you can pull from. That way, you’ll never wonder what you’re going to write or create next.
Now, if you’re already overflowing with ideas, this step will be easy. Create a document or a spreadsheet, list your ideas, and then bookmark it or keep it somewhere easy to access.
What if you’re not feeling super inspired though? Or if you’re unsure what you should write?
Even once you have a bank of ideas, prioritizing your content schedule can be a challenge too.
If this sounds like you, try following this simple and repeatable process for content ideation:
- Write down as many ideas as you can think of in 10 minutes. Don’t worry if they’re good ideas yet. Just get them written down.
- Spend another 10 minutes scoring those ideas a 3, 2, or 1. 3’s are great ideas you know your audience will love. 2’s are ideas that need some work. 1’s are duds. You’ll probably have a mix of ideas that land in all three buckets (and that’s normal).
- Spend your next 10 minutes prioritizing your 3’s and add them to your calendar. Keep your 2’s in your backlog to come back to later. Forget about your 1’s and pretend they never happened.
This isn’t the most in-depth or complete process for generating content ideas, but it’s a useful process for kickstarting your creativity, and generating a useful list of topics quickly.

Step 5: Add Ideas to the Calendar According to Your Publishing Cadence
You should now have enough ideas to fill your calendar for at least a few weeks. It’s a quick way to get started and fill that empty space without worrying whether your topic selection is perfect.
Now, add those ideas to your calendar. Whether that’s several pieces per week or just a few per month, you’re now on your way to maintaining and sustaining your publishing cadence.
Step 6: Stick to Your Deadlines
Your calendar can only help if you stick to your deadlines. Once something goes on the calendar, you’re making a promise to yourself (and your team) that it will get done by that date.
With that said, there will be times when meeting deadlines will not be possible.
Setting Up Your Calendar With Our Free Editorial Calendar Template
Now that we’ve gone through all the steps of creating a calendar, let’s look at what this looks like in actual practice. In order to help with this process, we’ve included a free template you can download by clicking the link in the image caption below:

This template includes the following fields:
- Month overview: Update this to be accurate with the days of the month for the given year.
- Due date: The deadline for each piece.
- Title: Either the final headline or working title.
- Format: The type of content that is being published.
- Category: The blog category the piece should be published under.
- Channel: Where the piece will be published.
- Audience: If you have different audiences for different pieces, list them here.
- Writer: The person creating the piece.
- File Link: A link to a Google or Word doc for the piece.
- Visual Files: Link to a folder with visual assets (images, video, etc.)
- Published URL: A link to the published piece once it’s complete.
- Status: Includes a dropdown selector for Not Started, In Progress, Editing, and Published.
- Notes: Anything that’s useful to know about each piece.
You can change these columns any way you’d like to suit your own needs.
Now, let’s walk through the process of adding a piece to this calendar. It may seem straightforward enough (and the template is designed to be easy to use), but it might be helpful to see how it works in actual practice. We’ll use this blog post you’re reading right now as an example.
First, I’d like this blog post to publish in the last week of September, but I also know it will need time for editing. I’ll set the Due Date to Friday, Sept. 23rd. I have a rough idea what the title will be, plus I know the format, WordPress blog post category, and which of our blogs it will be published on. Let’s go ahead and add that information:

Next, I’ll add links to where I’m storing the screenshots and the draft of the blog post. In order to keep everything organized, I’ll add my images to a folder in Google Drive, and a link to the Google Doc that I used to write this post. Since the piece hasn’t been published yet (as of this writing), I’ll leave that field blank for now:

The Status column uses a dropdown selector to denote the phase this project is in:

If you decide you’d like to change the status in the template, you can easily do this. First, import the spreadsheet template file into Google Sheets:

Then, click into a cell under the Status field. Next, click Data, then click Data Validation:
You can now edit the statuses in the dropdown by listing each list item you’d like, followed by a comma. Once you’ve edited the status, copy the cell, and paste it over the others in the template:

Seven Editorial Content Calendar Examples You Can Follow
Wondering what your calendar could look like once it’s up and running? Here are some examples built with different tools that you can check out for inspiration, even if you don’t use our template.
Editorial Calendar in Trello Example
Trello is a Kanban board app that allows you to organize your calendar into columns based on status:

Editorial Calendar in Asana Example
Asana is a robust project management platform that just so happens to work as a calendar too:

Editorial Calendar in Airtable Example
You might have heard about Airtable. It’s an extremely popular platform that takes basic spreadsheets to the next level.

Editorial Calendar in Edit Flow Example
Edit Flow has long been a staple plugin for content editors and managers. WordPress.com customers on Business Plans and higher can install it on their sites (find it here):

Editorial Calendar in Google Calendar Example
You can absolutely use Google Calendar for this purpose. It’s best to create a filter for your content or sync your Google Calendar with another tool that you use (many platforms like Trello have Google Calendar integrations). This can be particularly helpful if you have multiple people who want to see the calendar but don’t want to learn a new tool:

Editorial Calendar in Notion Example
Notion is a popular and flexible project management and note-taking tool (and honestly, that description doesn’t even begin to cover everything it can do). If you’re a Notion user, they have a great template for creating an editorial calendar quickly and easily:

Editorial Calendar in CoSchedule Marketing Calendar Example
CoSchedule’s Marketing Calendar is an advanced calendar platform that’s built for teams. They offer a generous free plan and it’s a great option if you want publishing automation and workflow management features. It’s available as a web app and a WordPress plugin:

Three Additional Tips for Using Your Content Calendar
That covers everything you need to know about setting up your calendar and the basics behind how they’re used.
Tip 1: Use Your Calendar for Every Piece You Publish
If it’s not on your calendar, it didn’t happen. Add everything you’re working on to the calendar and make it a habit.
Tip 2: Plan Simple Editorial and Content Creation Workflows
If you’re struggling to meet deadlines, or if your content creation process still feels disorganized, try creating some simple workflows or checklists you can follow. Some tools, like CoSchedule, Asana, Trello, and others, actually allow you to build workflow management directly into your calendar.
Even if you don’t use one of these tools though, you can still build checklists to manage your processes. Here’s how to get started:
- List all the steps you need to follow to complete a piece of content. If you create different types of content (blog posts, videos, newsletters, etc.), then create a checklist for each one.
- Estimate how long it takes to complete each step.
- Put all the steps in order within a spreadsheet or app of your choice.
Now, follow that process every time you create that type of content. This will help you build positive habits, and eventually, you’ll start to create content more quickly and consistently.
Tip 3: Measure Content Performance and Do More of What Works
Measuring content performance is a deep topic that we’ll need to save for another time, but we strongly recommend monitoring how your content performs, and creating more stuff that’s like your top-performing content. A calendar can make it easier to track what you’ve created and when it was published, which can help with this process.
Now You’re Ready to Rock Your Content Calendar
There isn’t a single correct way to create an editorial calendar. Rather, there are many different methods and tools you can follow. No matter which you choose though, all calendars have the same goal: helping you understand what you will publish and when you will publish it.
Start small and aim big. There’s nothing you can’t achieve.
No comments:
Post a Comment